Table of Contents
- Introduction
- Preparing your django application for deployment
- Choosing a hosting platform
- Deploying your django app on pythonanywhere
- Deploying your django app on heroku
- Some words on maintenance and monitoring
- End notes
Introduction
Django is a high-level Python web framework that makes it easy to build robust and scalable web applications. With its modular design and rich feature set, Django has become a popular choice among developers looking to build high-quality web applications.
However, building a great web application is just half the battle. In order to make it accessible to users and put it to use, it's crucial to deploy the application on a server. Deployment is the process of making an application available on the internet, and it's a critical step in ensuring that your application is accessible, secure, and scalable.
In this blog post, we'll be diving into the best practices for deploying Django applications. From choosing the right hosting platform to ongoing maintenance and monitoring, we'll cover everything you need to know to ensure that your Django application is deployed effectively and efficiently.
We'll also look at specific examples of deploying Django on a VPS and on a cloud platform, to give you a better understanding of the different options available. So, without further ado, let's get started!
Preparing your Django Application for Deployment
Before deploying your Django application, it's important to ensure that it's properly configured and ready for production use. Here are some key steps to follow to prepare your application for deployment:
-
Ensure all dependencies are listed in the requirements.txt file: The requirements.txt file lists all of the packages and dependencies that your application needs to run. This is essential for ensuring that your application runs smoothly in the production environment, as all of the required packages will be installed automatically.
You can list dependencies in requirements.txt with
pip list > requirements.txt -
Use environment variables for sensitive information: When deploying an application, it's important to keep sensitive information such as passwords and API keys secure. One way to do this is to use environment variables to store this information, rather than hard-coding it into your application.
You can use
django-environfor managing environment variables inside your project. You can install the package withpip install django-environ.Example
import environ env = environ.Env() # reading .env file environ.Env.read_env() # Raises django's ImproperlyConfigured exception if SECRET_KEY not in os.environ SECRET_KEY = env("SECRET_KEY") DATABASES = { 'default': { 'ENGINE': 'django.db.backends.postgresql_psycopg2', 'NAME': env("DATABASE_NAME"), 'USER': env("DATABASE_USER"), 'PASSWORD': env("DATABASE_PASSWORD"), 'HOST': env("DATABASE_HOST"), 'PORT': env("DATABASE_PORT"), } } -
Set
DEBUG=Falsein the production environment: Django's DEBUG mode is a convenient tool for development, but it should be turned off in production. When DEBUG is set to False, error pages will be more user-friendly, and sensitive information will not be leaked. -
Configure database settings: Your Django application will likely require a database to store data. Make sure to configure your database settings properly, including the database engine, host, and credentials.
-
Use a production-ready web server such as Gunicorn or uWSGI: When deploying your Django application, it's important to use a production-ready web server. Gunicorn and uWSGI are two popular options that are widely used by Django developers. These servers are specifically designed for production use, and offer performance and stability that is not possible with the default Django development server.
By following these steps, you'll be well on your way to preparing your Django application for deployment. By having a well-configured and production-ready application, you'll be able to focus on choosing the right hosting platform and deploying your application with confidence.
Choosing a Hosting Platform
Once you have prepared your Django application for deployment, the next step is to choose a hosting platform. There are several options available, each with its own pros and cons. Let's take a look at some of the most popular options:
- Shared Hosting: Shared hosting is the most affordable option, and is suitable for small or personal projects. With shared hosting, you'll be sharing a server with other websites, which can lead to performance issues if the server becomes congested.
- Virtual Private Server (VPS): A VPS offers more resources and control than shared hosting, and is suitable for small to medium-sized projects. With a VPS, you'll have your own virtualized environment on a server, allowing you to install the software and configurations of your choice.
- Cloud Hosting: Cloud hosting is a scalable and flexible option that is suitable for large-scale projects. With cloud hosting, you'll be able to easily scale your resources up or down as needed, and you'll have access to a wide range of tools and services to manage your application.
- PythonAnywhere: PythonAnywhere is a hosting platform specifically designed for Python applications, including Django. It offers a simple and straightforward way to deploy Django applications, and is suitable for small to medium-sized projects.
- Heroku: Heroku is a popular cloud platform that offers a simple and hassle-free way to deploy and manage applications. It's suitable for small to large-scale projects, and is a great option for Django applications due to its robust feature set and developer-friendly environment.
Ultimately, the best hosting option for your Django application will depend on the size and scale of your project, as well as your budget and technical expertise. If you're just starting out, shared hosting or PythonAnywhere may be the best option. If you have a large-scale project, cloud hosting or Heroku may be the better choice.
In conclusion, choosing the right hosting platform is an important step in deploying your Django application. By carefully considering the pros and cons of each option, you'll be able to make an informed decision and deploy your application with confidence.
Deploying your django app on pythonanywhere
PythonAnywhere is a popular platform that provides easy and straightforward deployment options for Django applications. In this section, we will go through the steps of deploying a Django application on PythonAnywhere. This platform is especially suitable for beginners who are looking for a hassle-free deployment process.
Here's an overview of the steps involved.
- Upload your code to PythonAnywhere
- Set up a virtualenv and install Django and any other requirements
- Set up your web app using the manual config option
- Add any other setup (static files, environment variables etc)
Upload your code to pythonanywhere
You can share your code on websites like github or gitbucket and you can clone the code to your pythonanywhere webapp by,
$ git clone https://github.com/myusername/myproject.gitCreate a virtualenv and install Django and any other requirements
In your Bash console, create a virtualenv, naming it after your project, and choosing the version of Python you want to use:
$ mkvirtualenv --python=/usr/bin/python3.10 mysite-virtualenv
(mysite-virtualenv)$ pip install -r requirements.txt
Setting up your Web app and WSGI file
At this point, you need to be armed with 3 pieces of information:
- The path to your Django project's top folder -- the folder that contains "manage.py", eg /home/myusername/mysite
- The name of your project (that's the name of the folder that contains your settings.py), eg mysite
- The name of your virtualenv, eg mysite-virtualenv
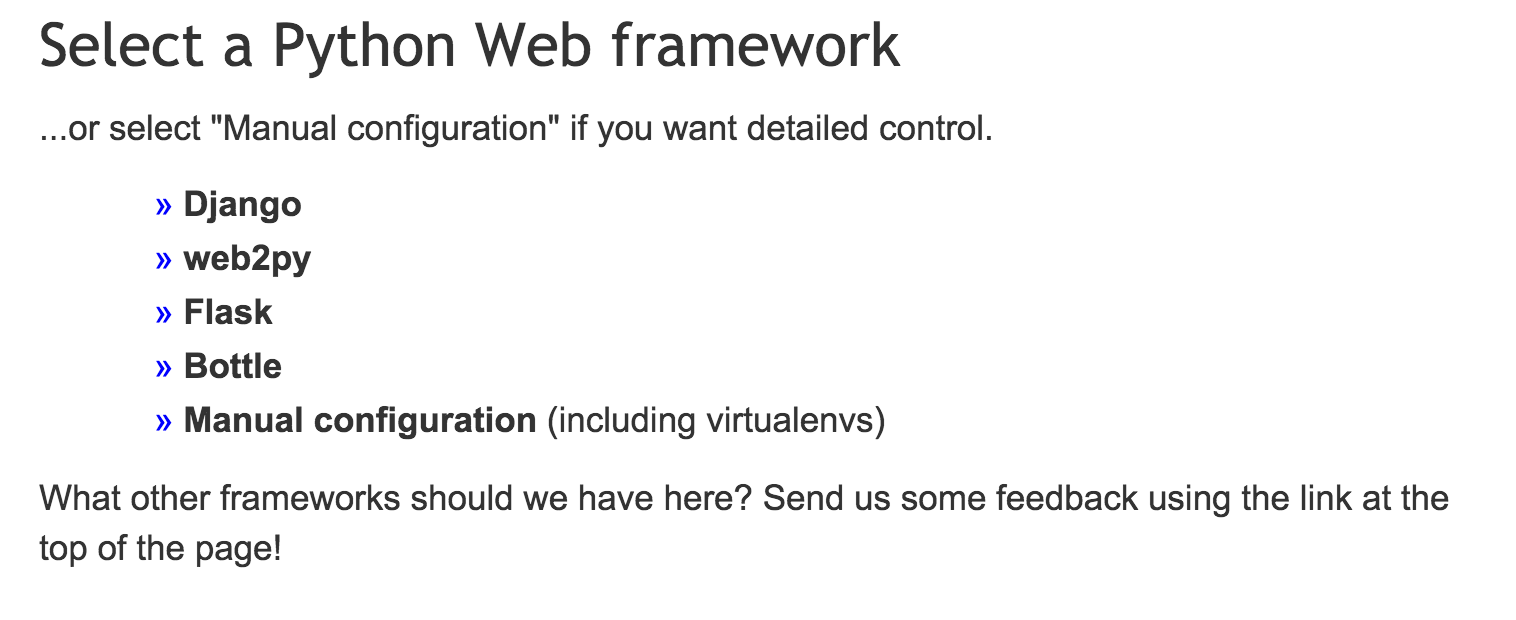
Create a Web app with Manual Config
Head over to the Web tab and create a new web app, choosing the "Manual Configuration" option and the right version of Python (the same one you used to create your virtualenv).
Enter your virtualenv name
Once that's done, enter the name of your virtualenv in the Virtualenv section on the web tab and click OK.
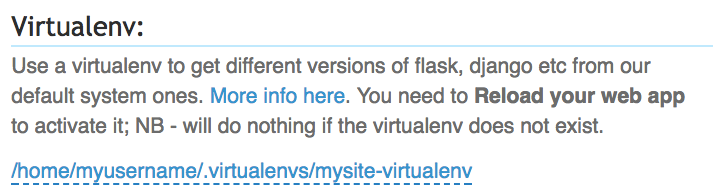
You can just use its short name "mysite-virtualenv", and it will automatically complete to its full path in /home/username/.virtualenvs.
Set your working directory and give yourself a convenient hyperlink to your source files from the web tab.
Enter the path to your project folder in the Code section on the web tab, eg /home/myusername/mysite in Source code and Working directory

Edit your WSGI file
One thing that's important here: your Django project (if you're using a recent version of Django) will have a file inside it called wsgi.py. This is not the one you need to change to set things up on PythonAnywhere -- the system here ignores that file.
Instead, the WSGI file to change is the one that has a link inside the "Code" section of the Web tab -- it will have a name something like /var/www/yourusername_pythonanywhere_com_wsgi.py or
/var/www/www_yourdomain_com_wsgi.py.
Click on the WSGI file link, and it will take you to an editor where you can change it.
Delete everything except the Django section and then uncomment that section. Your WSGI file should look something like this:
# +++++++++++ DJANGO +++++++++++
# To use your own Django app use code like this:
import os
import sys

# assuming your Django settings file is at '/home/myusername/mysite/mysite/settings.py'
path = '/home/myusername/mysite'
if path not in sys.path:
    sys.path.insert(0, path)

os.environ['DJANGO_SETTINGS_MODULE'] = 'mysite.settings'

from django.core.wsgi import get_wsgi_application
application = get_wsgi_application()
Deploying your Django app on Heroku
-
Sign up for a Heroku account and install the Heroku CLI.
-
Create a new Heroku application by running the following command in your terminal
heroku create -
Prepare your Django app for deployment by including the required dependencies in a
requirements.txtfile and creating aProcfileto specify the command to run the app. For example:# requirements.txt Django==3.0.5 gunicorn==20.0.4 psycopg2==2.8.5 # Procfile web: gunicorn myproject.wsgi --log-file - -
Commit your changes and push your code to Heroku using Git:
git push heroku main -
Configure the Heroku environment variables for your app. For example, set the
DJANGO_SETTINGS_MODULEandSECRET_KEYin the Heroku CLI:heroku config:set DJANGO_SETTINGS_MODULE=myproject.settings.production heroku config:set SECRET_KEY=<your_secret_key> -
Set up a database for your app on Heroku. You can use Heroku's free PostgreSQL database, for example:
heroku addons:create heroku-postgresql:hobby-dev -
Finally, run the following command to launch your app:
heroku open
Tips for Maintenance and Monitoring
When deploying a Django application, maintenance and monitoring are critical aspects to ensure its smooth and uninterrupted operation. Some key points to consider include:
- Keeping your application up-to-date with the latest security patches to prevent any potential security threats.
- Monitoring logs and performance metrics is essential to identify and resolve any issues quickly. This can be done using tools such as Sentry or New Relic.
- Setting up automatic backups and disaster recovery plans can help protect against any data loss or downtime. For example, you can use services like AWS S3 or Google Cloud Storage for backups, and use tools like Disaster Recovery as a Service (DRaaS) to prepare for potential disasters.
By taking these steps, you can ensure that your Django application remains stable and secure, even as it grows and scales over time.
Conclusion
In conclusion, deploying a Django application is an important step in bringing your web application to production. By following best practices, you can ensure that your application is secure, performant, and reliable.
This includes preparing your application for deployment, choosing the right hosting platform, deploying your application, and maintaining and monitoring it. Whether you choose to deploy on a VPS, cloud platform, or PythonAnywhere, the key is to understand the steps involved and follow best practices.
In this post, we have outlined the best practices for deploying Django applications and provided tips for a smooth and successful deployment.